PAT Breakdown #6: The key to keyholes
This pre-dental blog is brought to you by Crack the DAT. Crack the DAT offers all the resources you need to ace your Dental Admission Test, all in one place! Try it today: CrackDAT.com
On the Perceptual Ability Test (PAT section) of the Dental Admission Test, you’ll encounter six question types that assess your spatial and visual reasoning skills. One of these question types is keyholes (also known as apertures). Read on to learn all about keyholes and to learn strategies that will help you master these questions!
What to expect
On the the Dental Admission Test (DAT), you will have a total of 15 keyhole questions (#1–15 of the PAT section — the first question type you will encounter). You will see a 3D figure. Your goal is to determine through which opening (aperture) that 3D figure could pass. You’ll have 5 answers to choose from. You’re looking for the opening that would be a perfect fit, much like a keyhole is the perfect fit for its corresponding key. Here’s an example of this PAT question type:

Keyholes tends to be one of the trickier question types because you need to imagine the 3D object from various angles and mentally manipulate it. However, with practice — and with the aid of the strategies below — we assure you that you will be able to master keyholes. So read on!
The rules
There are a few rules to keep in mind:
- You can mentally manipulate (ie., rotate or turn) the 3D object in your mind before “passing” it through an aperture.
- Once you’ve started “passing” the object through the aperture, you cannot rotate or manipulate it further. You must “pass” it straight through the aperture.
- The aperture must be a perfect fit for the 3D object in both shape and size.
The strategies
- Practice makes perfect. It’s true for every PAT question type! With time and practice, you will be able to visualize how the 3D figures fit into their corresponding keyholes. Do practice sets, including the keyhole practice tests on CrackDAT.com (being sure to pay attention to the explanations for the questions you miss or guess on), and download the CrackDAT app to practice and review in your spare time. You will improve your speed and accuracy as you familiarize yourself with keyholes, so set aside at least 10–15 minutes each day to practice and learn from your mistakes, and don’t give up!
- Get comfortable visualizing the top-bottom, left-right, and front-back projections of each object. This is the key to keyholes! Here’s what we mean. First, we’re going to shade the top-bottom projection of the example above.

As you can see, if we look at this object from top to bottom, it looks like a square/diamond. There are two rectangular prisms stuck on top of this figure (which we’ve indicated with dotted lines for visualization), but they don’t jut out. They’re flush with the edges of the object.
Next, we’re going to shade the left-right projection.

The left-right projection is depicted above. It is formed by the rectangle-shaped base of the object plus the jutting-out parts of the rectangular prisms on top.
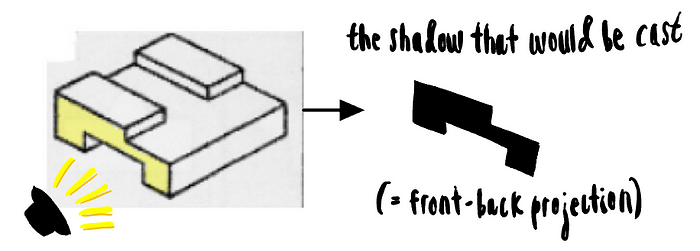
Finally, we’re going to shade the front-back projection.

Not quite sure how to visualize these projections? Try the following tricks:
- Imagine the 3D objects are made of aluminum (like soda cans) and are being crushed flat from top to bottom, left to right, or front to back. As a simple example, let’s imagine the 3D object is cylindrical, like a soda can. Imagine crushing the can from top to bottom to get the top-bottom projection. What would that projection look like?
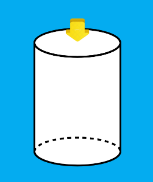
If you guessed that the projection would look like a circle, you’re correct.

Try applying this visualization technique to more complex 3D figures, such as the figure in our example. If we “crushed” the 3D figure from our example from top to bottom, it would look like a square/diamond. It would look like our top-bottom projection.

- Imagine the shadows the figure would cast. If the soda-can trick isn’t quite working for you, here’s another visualization technique. Imagine that a light is being shined at the 3D object from the top, front, or side. The shadow you would see would correspond to the top-bottom, front-back, or left-right projection, respectively.
- Use the process of elimination to your advantage. Remember, the keyhole questions, like all questions on the DAT, are multiple choice. Use this to your advantage! Here’s how we would use the process of elimination to work through our example question.
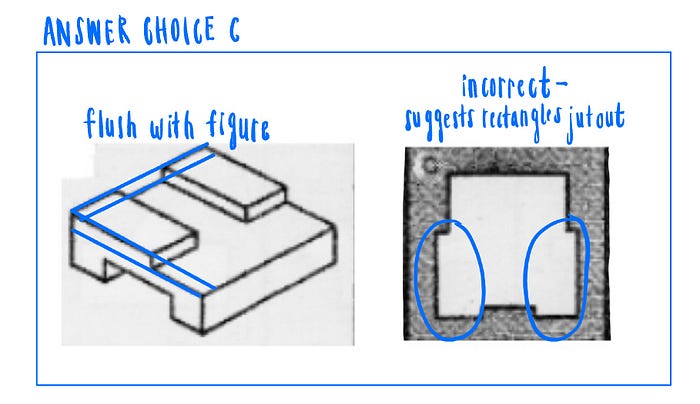
Let’s start with C — it looks most like our top-bottom projection. However, as we established previously, the top-bottom projection is a square /diamond— the rectangular prisms on top don’t jut out. Eliminate C.
Let’s look at A — it doesn’t really resemble any of our projections for this 3D figure. Eliminate A.
Finally, let’s look at B, D, and E. We are grouping them together because they all look somewhat similar to our front-back projection.
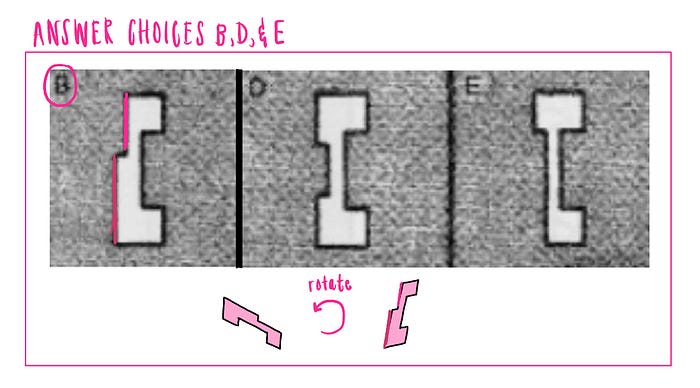
Only B is an appropriate match. If you rotated our sketch of the front-back projection, it would correspond with B. Therefore, B is our correct answer!
- Use your top-front-end (TFE) skills! Visualizing the projections for keyholes is just like visualizing the top, front, and end views for TFE. Check out our strategy guide for TFE here.
- Manage your time. You can budget more time for the keyhole questions since they require more time than the strictly 2D questions, like angle ranking. But don’t dwell on a question if you’re stumped — just mark it, take your best guess, and move on! Also, remember that speed comes with practice, so don’t be discouraged if you need a lot of time per question at the beginning of your preparation.
With practice, you will notice improvements in the way you tackle keyhole questions. Don’t give up — you’ve got this!
Wishing you the best of luck in your PAT preparation!
—
Join the Crack the DAT community, connect with other pre-dental students, and ask questions! Join the Facebook group here.
Crack your Dental Admission Test! Visit our website at CrackDAT.com.