PAT Breakdown #2: Mastering hole punching
This pre-dental blog is brought to you by Crack the DAT. Crack the DAT offers all the resources you need to ace your Dental Admission Test, all in one place! Try it today: CrackDAT.com
Hole punching, also known as paper folding, is one question type you’ll encounter on the DAT’s Perceptual Ability Test, or PAT section. This is your guide to mastering hole punching: read on to learn what to expect and how to breeze through these questions with ease!
What to expect
On the Dental Admission Test, you will have a total of 15 hole punching questions (#46–60 of the PAT section). You will see 4x4 squares which represent pieces of paper. Each paper is folded multiple times in various directions — horizontally, vertically, diagonally — and then one (or more) holes is punched in the paper. You must determine what the pattern of hole punches would look like in the unfolded paper. Here’s a simple example of a hole punching question:

Here is the answer to the question above: the paper would have 4 hole punches down the left side, represented by the black circles. The unshaded circles represent areas with no hole punching.

The rules
The rules for hole punching are straightforward:
- The square paper will never be turned or rotated in any way — it will just be folded!
- Unshaded circles represent areas with NO holes punched. Shaded circles represent areas that have been hole punched.
- The final pattern of hole punches will always fit within the 4x4 grid.
The strategies
- Practice as much as possible! The more you practice hole punching, the more you will improve, even if you occasionally feel stuck. Have confidence that your practice is valuable and will be worthwhile. Gain experience with hole punching questions and common fold patterns using practice sets and question generators. Practice hole punching on the go using the CrackDAT app. With practice, you’ll notice that not only does your accuracy improve, but also your speed — the hole punching section is a great opportunity to answer many questions correctly without needing to dedicate too much of your valuable PAT time.
- Model the situation using paper. If you’re struggling to visualize the questions in the hole punching section of PAT, or you’re just getting started familiarizing yourself with these questions, recreate them yourself using paper and a hole punch. Cut out a small square of paper, fold it however you wish, and punch a hole. Try to imagine what the paper will look like once unfolded, then unfold it and compare to your prediction. Creating a physical model for this question type will help hole punching become much less abstract and much more manageable.
- Try a grid method. Some people can mentally unfold the paper with relative ease to determine the correct answer choice— if that works well for you, great! However, if you’re struggling to visualize the unfolding of the paper even after practicing, you’re not alone. Try creating a grid to keep track of the placement of the hole punches. When you get to the hole punching questions on PAT (or at the end of the Survey of Natural Sciences, if you happen to have a few moments to spare), quickly draw 15 grids on your scratch paper.

Now, using the grid, work backwards. Mark (using an X or a dot) the location of the hole punch(es) shown in the rightmost figure. Then, look at the next-to-last figure. Mark on your grid where the hole punch(es) would appear at that point. Continue until you make it to the first fold. The final pattern of marks on your grid should match up with the correct arrangement of hole punches — just compare your grid with the answer choices, select the one that matches, and move on!
Why is this technique helpful? This method requires you to tackle just one fold at a time. You don’t have to visualize everything at once, but rather take it step-by-step.
There are numerous videos online explaining the grid method. Check out this video (linked below) to learn a version of this method that is particularly useful for more challenging hole punching questions, such as questions where the hole is punched over a folded edge.
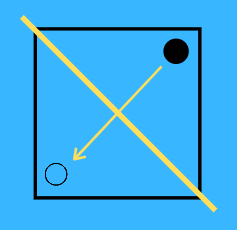
- Think about lines of symmetry. Again, a fold line is just a line of symmetry, or a line of reflection. Look at the image below, and imagine the yellow line is a fold line. That means the yellow line is just a line of symmetry/reflection: so just reflect the hole punch from the top right corner over the line to the bottom left corner. If you think about all the fold lines you see in the hole punching section in this way, you’ll have an easier time breezing through the section.
The hole punching section, because it relies less on 3D spatial perception than other questions in PAT, is a section you can handle with relative ease, leaving ample time for you to tackle the rest of PAT. With increased practice, and as you continue to learn and implement the above strategies, you will become increasingly comfortable with hole punching. Good luck!
—
Join the Crack the DAT community, connect with other pre-dental students, and ask questions! Join the Facebook group here.
Crack your Dental Admission Test! Visit our website at CrackDAT.com.